Battery switch on travel trailer function is crucial for managing your RV’s power. Understanding how these switches work, from their various types and internal mechanisms to safe connection and troubleshooting, is key to avoiding electrical problems and maximizing battery life. This guide dives into the specifics, covering everything from simple single-pole switches to more complex dual-battery setups, ensuring you’re equipped to handle any situation on the road.
We’ll explore different switch types, detailing their internal workings with clear diagrams. Learn safe connection and disconnection procedures, including crucial safety precautions. We’ll also tackle common issues like troubleshooting power problems and performing preventative maintenance. Finally, we’ll guide you through selecting the right switch for your specific needs, considering factors like amperage and the number of batteries in your setup.
Battery Switch Types in Travel Trailers
Choosing the right battery switch for your travel trailer is crucial for managing power and preventing electrical issues. Understanding the different types available helps you select the best option for your needs and setup. This section details the common types, their inner workings, and a comparison of their strengths and weaknesses.
Single-Pole Battery Switches
A single-pole battery switch is the simplest type. It’s essentially an on/off switch controlling the connection between a single battery and the trailer’s electrical system.
| Switch Type | Diagram | Function | Advantages/Disadvantages | ||||||||||
|---|---|---|---|---|---|---|---|---|---|---|---|---|---|
| Single-Pole |
|
Connects or disconnects the positive (+) terminal of a single battery to the trailer’s electrical system. The negative (-) terminal is usually a direct connection. | Advantages: Simple, inexpensive. Disadvantages: Only controls one battery; no isolation of the battery from the trailer’s system. |
Double-Pole Battery Switches
Double-pole switches offer more control. They simultaneously manage both the positive (+) and negative (-) terminals of a single battery, allowing for complete isolation from the trailer’s system when turned off.
| Switch Type | Diagram | Function | Advantages/Disadvantages | ||||||||||
|---|---|---|---|---|---|---|---|---|---|---|---|---|---|
| Double-Pole |
|
Connects and disconnects both the positive and negative terminals of a single battery to the trailer’s electrical system. | Advantages: Complete battery isolation, improved safety. Disadvantages: Still only controls one battery. |
Double-Pole, Double-Throw (DPDT) Battery Switches
These switches allow you to select between two different batteries (e.g., a house battery and a starting battery) or to connect to shore power, offering significant flexibility. They control both positive and negative terminals for each battery source.
| Switch Type | Diagram | Function | Advantages/Disadvantages | ||||||||||||||||||||
|---|---|---|---|---|---|---|---|---|---|---|---|---|---|---|---|---|---|---|---|---|---|---|---|
| Double-Pole, Double-Throw (DPDT) |
|
Selects between two different battery sources for powering the trailer. | Advantages: Selects between multiple batteries, increased flexibility. Disadvantages: More complex, potentially more expensive. |
Battery Switch Brand Comparison
Several reputable brands manufacture battery switches for RVs and travel trailers. Factors such as amperage rating, build quality, and ease of installation should be considered when making a choice. While specific performance data varies, brands like Blue Sea Systems and Perko are generally well-regarded for their reliability and durability. Direct comparisons require reviewing specific product specifications. However, a higher price often correlates with better quality components and longer lifespan.
So, you’re planning a trip? Awesome! First things first: get yourself sorted with travel insurance. Check out Aon travel insurance for solid coverage. Then, if you’re an audiophile like me, don’t forget your tunes! Seriously consider a portable setup – you can find some great tips and gear recommendations on audiophile travel aetup sites to help you plan.
Having your favorite music on the go makes any trip better!
Connecting and Disconnecting Batteries
Connecting and disconnecting your travel trailer batteries using a battery switch is a crucial task for maintaining your power system and ensuring safety. Improper handling can lead to sparks, damage to your battery, or even injury. This section provides a step-by-step guide to safely perform these operations.
Safe Battery Handling Procedures
Working with batteries involves potential hazards. Always wear safety glasses to protect your eyes from potential acid splashes. Ensure the area is well-ventilated to avoid inhaling potentially harmful fumes. Never work on batteries near open flames or sparks. Finally, always have a fire extinguisher readily available.
Always wear safety glasses and gloves when working with batteries.
Work in a well-ventilated area.
Keep a fire extinguisher nearby.
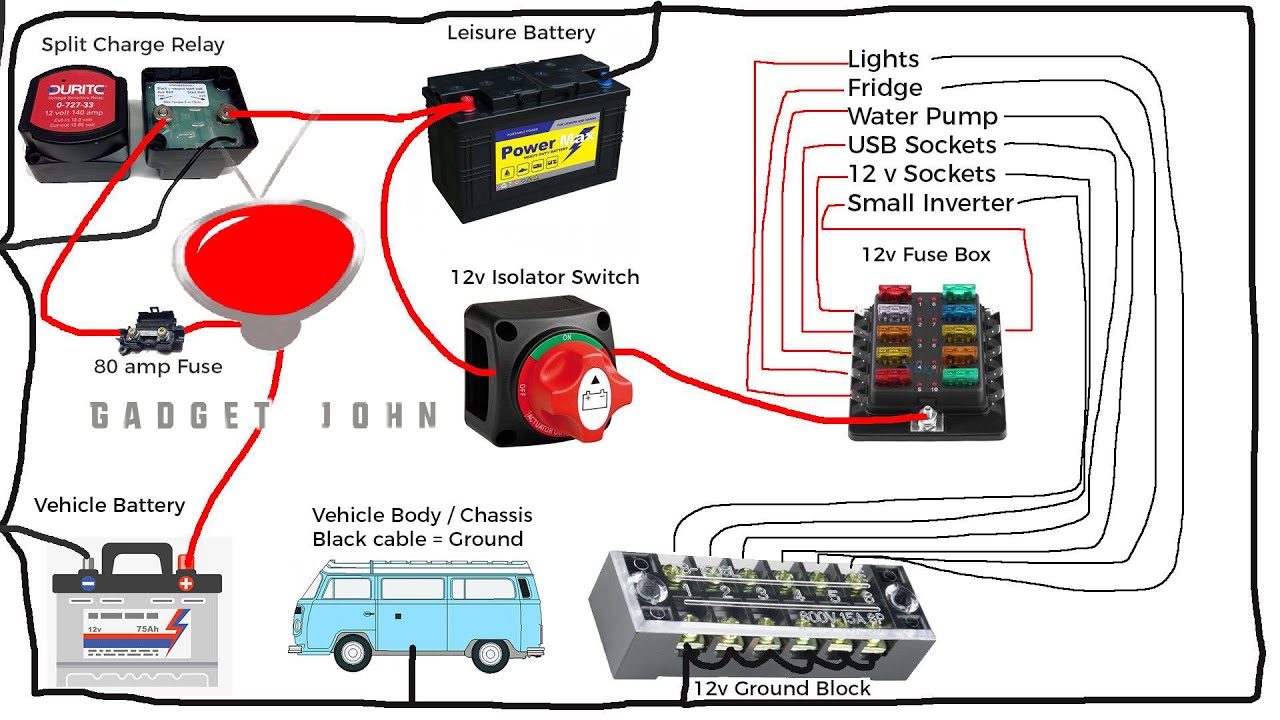
Connecting Batteries to a Battery Switch
Before connecting, ensure your battery switch is in the “OFF” position. This prevents accidental shorts. A typical dual-battery setup uses a battery switch to isolate or combine the power from two batteries. The following steps Artikel the process for a common configuration.
Always ensure the battery switch is in the “OFF” position before making any connections.
So, you’re planning a trip? Awesome! First things first: get yourself sorted with travel insurance. Check out Aon travel insurance for solid coverage. Then, if you’re an audiophile like me, don’t forget your tunes! Seriously, having the right audiophile travel setup can make or break a trip, especially on long flights.
Make sure to pack accordingly and enjoy your adventure!
- Identify your wires: You’ll typically have positive (+) and negative (-) cables for each battery. Positive cables are often red, and negative cables are black or sometimes green.
- Connect the positive cables: Connect one red positive cable from each battery to a separate terminal on the battery switch’s positive input side. Ensure the connections are secure and tight.
- Connect the negative cables: Connect one black negative cable from each battery to the switch’s negative input side. Again, make sure the connections are tight.
- Connect the output cables: Connect the red positive output cable from the switch to the positive terminal of your trailer’s main power distribution system. Connect the black negative output cable from the switch to the negative terminal of your trailer’s main power distribution system.
- Double-check connections: Verify that all connections are secure and there are no loose wires before turning the switch on.
Disconnecting Batteries
Disconnecting your batteries is just as important as connecting them. Proper disconnection prevents accidental power drain and potential shorts.
Always turn the battery switch to the “OFF” position before disconnecting any cables.
- Turn off the battery switch: This isolates the batteries from the trailer’s electrical system.
- Disconnect the output cables: Carefully disconnect the positive (+) and negative (-) output cables from the trailer’s main power distribution system.
- Disconnect the battery cables: Disconnect the positive (+) and negative (-) cables from each battery at the battery switch terminals.
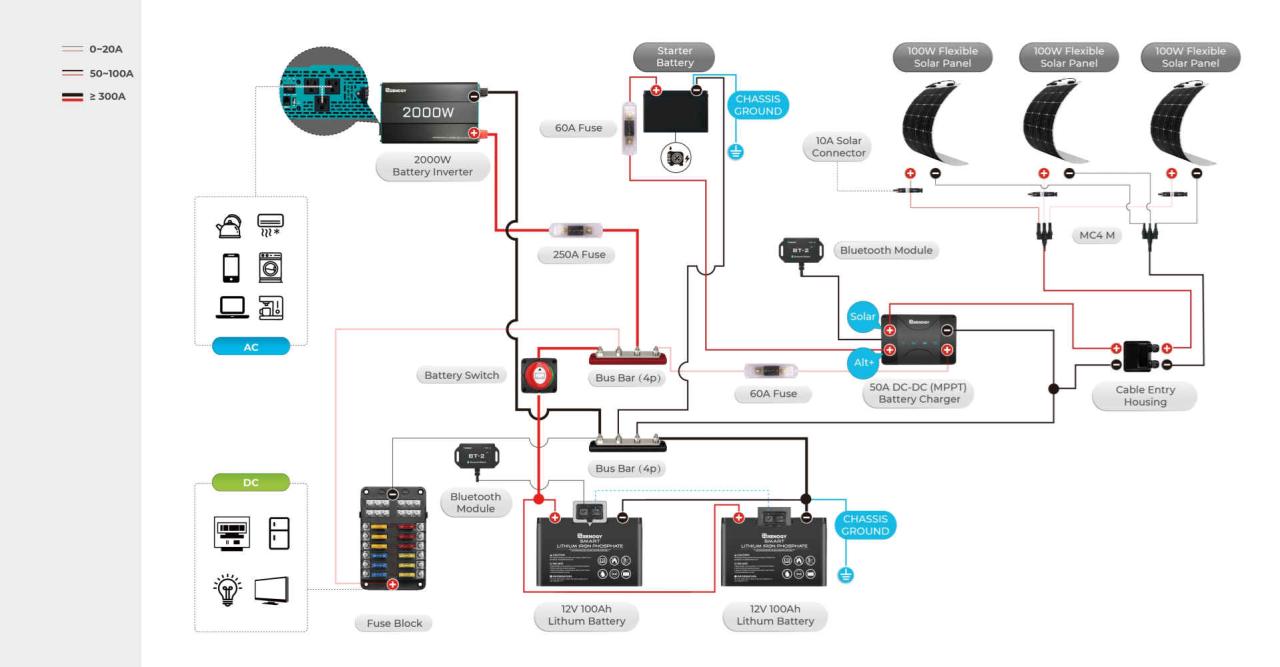
Dual-Battery Setup Wiring Diagram, Battery switch on travel trailer function
Imagine a diagram. At the top are two batteries, Battery 1 and Battery 2. Each battery has a red (+) and black (-) terminal. From each (+) terminal, a red wire runs to a separate input terminal on a battery switch. From each (-) terminal, a black wire runs to a separate input terminal on the battery switch.
The battery switch has a single red (+) output terminal and a single black (-) output terminal. From the (+) output terminal, a red wire runs to the positive terminal of your trailer’s main power distribution system. From the (-) output terminal, a black wire runs to the negative terminal of your trailer’s main power distribution system.
Battery Switch Operation Flowchart
[Imagine a flowchart here. It would begin with the battery switch in the “OFF” position. A branch would show the “ON” position connecting both batteries. Another branch would show selection of Battery 1 only, and another branch for Battery 2 only. Potential failure points, such as a loose connection or a faulty switch, would be indicated on the chart with appropriate symbols and labels.]
Battery Switch Integration with Other Systems
Your travel trailer’s battery switch isn’t an isolated component; it’s the central hub for managing power flow between your batteries and the various electrical systems onboard. Understanding its interaction with other systems is key to efficient power management and preventing electrical problems. This section details how the battery switch works in conjunction with solar panels, the converter, and the inverter, and the consequences of malfunction.
The battery switch acts as a gatekeeper, controlling the flow of power from your batteries to the rest of your RV’s electrical systems. When the switch is in the “on” position, power from the batteries is available to all connected systems. Conversely, turning the switch “off” isolates the batteries, preventing discharge, even if other systems, like the converter, are active.
This is crucial for preserving battery life and preventing accidental drain.
System Interactions
Here’s a breakdown of how the battery switch integrates with key electrical components in your travel trailer:
| Component | Interaction with Battery Switch | Function |
|---|---|---|
| Solar Panels | Typically connected directly to the battery, bypassing the switch. A charge controller manages the charging process. | Provides renewable energy to charge the batteries. |
| Converter | Receives power from the battery through the switch (usually). Converts 12V DC to 120V AC for household appliances. | Powers lights, outlets, and other 120V appliances when shore power isn’t available. |
| Inverter | Draws power from the battery through the switch. Converts 12V DC to 120V AC. | Powers appliances that require 120V AC, such as laptops or microwaves. |
| House Batteries | Directly connected to the battery switch. | Provide power to the RV’s electrical systems. |
Impact of a Faulty Battery Switch
A malfunctioning battery switch can cause several problems. For example, a switch that fails in the “on” position could lead to continuous battery drain, even when the trailer isn’t in use. Conversely, a switch stuck in the “off” position renders your house batteries completely unusable, leaving you without power for lights, appliances, and other essential systems. This highlights the importance of regular inspection and maintenance.
In some cases, a faulty switch might create intermittent power issues, leading to unpredictable operation of connected devices.
Battery Power Conservation and Extended Battery Life
Proper use of the battery switch is crucial for maximizing battery life. Always turn the switch “off” when the trailer is not in use or when shore power is available. This prevents parasitic drain from low-current draws, such as clocks and smoke detectors. Additionally, remember to disconnect the batteries completely when storing your trailer for extended periods, even if you have a battery disconnect switch separate from the main switch.
This prevents slow discharge and extends the lifespan of your investment. For example, a battery that normally lasts 3 years might last 5 years with consistent and proper use of the battery switch.
Selecting the Right Battery Switch: Battery Switch On Travel Trailer Function
Choosing the correct battery switch for your travel trailer is crucial for safe and reliable power management. A poorly chosen switch can lead to overheating, insufficient power delivery, or even dangerous electrical shorts. This section will guide you through selecting the appropriate switch based on your specific needs.
The primary factors to consider are the amperage rating, the number of batteries, and the type of batteries you’re using. Amperage rating must exceed the maximum current draw of all your appliances combined, while the number of battery positions depends on whether you have a single or dual battery setup (or even more). Battery type influences the voltage and potential current demands.
Amperage Rating and Battery Count
Determining the correct amperage rating is critical. You need a switch that can handle the total amperage draw of all your appliances simultaneously. For example, if your combined appliances draw a maximum of 150 amps, you’ll need a switch with a higher rating, perhaps 200 amps, to provide a safety margin. Don’t skimp here; undersized switches are a fire hazard.
The number of batteries directly relates to the number of switch positions. A single battery system requires a two-position switch (on/off), while dual battery systems need at least a three-position switch (battery 1, battery 2, both batteries).
Battery Switch Types and Features
Several battery switch types are available, each with its own set of features and capabilities. Common types include:
- Rotary Switches: These are the most common type, offering simple on/off or multiple battery selection. They’re generally affordable and easy to install but may be less durable than other types. A typical rotary switch might have positions for “Off,” “Battery 1,” “Battery 2,” and “Both Batteries.”
- Push-Button Switches: These switches offer a more modern look and feel. They can be more durable than rotary switches and may offer features like LED indicators to show the selected position. However, they can be more expensive.
- Remote Switches: These allow you to control the battery switch from a convenient location, often inside the trailer. This adds convenience but increases complexity and cost.
Specifications to consider include the amperage rating (as previously discussed), the number of positions, the type of terminals (studs, ring terminals, etc.), and the mounting style (panel mount, surface mount, etc.). Look for switches with clear and easy-to-understand labeling.
Examples of Battery Switch Installations
The following are examples of common battery switch configurations in travel trailers:
- Single 12V Battery System: A simple two-position (on/off) switch is sufficient for a single 12V battery setup.
- Dual 12V Battery System with Combined Use: A three-position switch allows selection of either battery 1, battery 2, or both in parallel for increased capacity.
- Dual 12V Battery System with Separate Circuits: A four-position switch could allow for separate control of each battery, or one battery for house systems and another for starting the vehicle, with an additional “off” position. This setup is often found in trailers with integrated towing vehicles.
Selecting a High-Quality Battery Switch
When selecting a battery switch, prioritize quality and reliability. Look for switches from reputable manufacturers with a proven track record. Read reviews from other users to gauge the durability and performance of different brands and models. A high-quality switch will be made from durable materials, have clearly marked terminals, and be easy to install. Choosing a switch with a higher amperage rating than your anticipated need provides a crucial safety margin and prevents premature failure.
Also, consider features like LED indicators or remote operation based on your preferences and budget.
Mastering your travel trailer’s battery switch is essential for a smooth and enjoyable RV experience. By understanding the different types of switches, implementing safe connection practices, and knowing how to troubleshoot common problems, you’ll ensure reliable power and extend the life of your batteries. Remember, preventative maintenance is key – regular inspections and cleaning can prevent costly repairs down the line.
So, get familiar with your switch, and hit the road with confidence!
Essential Questionnaire
What’s the difference between a single-pole and a double-pole battery switch?
A single-pole switch controls one circuit, typically connecting or disconnecting a single battery. A double-pole switch controls two circuits, often used for switching between two batteries or isolating both.
How do I know if my battery switch is bad?
Symptoms include no power, intermittent power, overheating, or unusual smells. Use a multimeter to check voltage and continuity at the switch terminals.
Can I use a battery switch with solar panels?
Yes, but proper wiring is crucial. Ensure the solar charge controller is wired correctly to prevent backfeeding and damage to your batteries or other components.
How often should I inspect my battery switch?
At least once a year, or more frequently if you use your RV extensively. Check for corrosion, loose connections, and signs of overheating.
